I have a confession.
I’m not always the best at using the right tools for a given task. I’d often rather use what I have on hand than go out and spend money on something I’d only use for one project. Examples:
- I use a tea strainer in lieu of a flour sifter.
- The time I trimmed the bushes with a hand saw. Or trimmed weeds with scissors.
- For a long time, I boiled water in a frying pan because I couldn’t justify spending the money on a stockpot.
- After I lost my travel mug, I just carried my coffee to work in a jar.
The list is endless. Really.
So, when I offer up a list of the most necessary quilting tools, you can be assured that I’m not listing a single item that you won’t be using constantly. Stated another way, these are the items that will help you maintain your sanity if you’re getting into quilting even a little bit.
Keep in mind, I’m writing as a beginner, for beginners. However, I’ve done a ton of research so–in an effort to save you some time–I’ve provided many links to folks who can build upon the basics I’ve outlined here.

Batting: If you’re making a quilt, you’ll need batting. Currently, I use Hobbs Heirloom Premium 80/20 blend. I read lots of reviews before buying, and this one from The Tulip Patch was one of the most helpful. In short, I picked Hobbs because it has the traditional look and feel (like a vintage quilt), but at a lower price than similar brands. When I want to level-up my quilting, I’ll probably choose another batting, like the 100% cotton Warm & Natural.
Sewing machine: (Not pictured.) I have a basic Brother sewing machine that I found on Craigslist for $30. The previous owner only used it for hemming, so all of the doo-dads (technical term) were still with the machine.
Feet: As in, sewing machine feet. From left to right you’ll see the walking foot, free motion quilting foot, and quarter inch (1/4″) foot.
- The walking foot is used last (so, of course I list it first), when you’re sewing the quilt sandwich together. This foot moves thick layers of fabric through the sewing machine from the top and bottom (instead of only the bottom) to make sure the layers stay lined up as you’re sewing. Note: This foot is not 100% necessary, but it will potentially save you a lot of trouble. If you don’t have this, test quilt a small quilt sandwich to see how your machine cooperates.)
- The free motion quilting foot has yet to be used in my house, because I’m still quilting in straight lines with my walking foot, so obviously it isn’t a must-have. When I want to start free motion quilting, this will become a necessity.
- The 1/4″ foot has seen a lot of use. Basically, it’s used when you’re piecing (sewing the quilt top together) to help you get those important 1/4″ seams. The tinier the pieces and the more elaborate the design, the more important it is to those seams just right. In-depth information can be found at SewMamaSew.
Rotary cutter, rotary mat, and clear acrylic ruler: In my mind, these items are a team. I didn’t have them for my first quilt, but I also didn’t do any substantial cutting. After I finished my first quilt, I purchased these as a set on Amazon and haven’t looked back.
- The rotary cutter, for me, is much faster and more accurate in cutting fabric than using scissors.
- The rotary mat is a must-have if you have a rotary cutter. Mine is 18″ x 24″ and I’ve found that to be a good size for my workspace.
- The acrylic ruler makes sure your lines are straight, and it was more useful than I could have imagined. Mine is 6″ x 24″, a pretty versatile size. You can cut small pieces or cut long lengths of fabric (like for this strip quilt at Cluck Cluck Sew). There are many sizes to choose from as you grow as a quilter.
Note: If you’re using pre-cut fabric (i.e. charm packs, layer cakes, jelly rolls) and have no plans of cutting it, you can hold off on the rotary cutter and mat. I “tested” my interest in quilting with my first quilt by using pre-cuts and forgoing almost all cutting. This way, the financial investment in a potential hobby was minimal.
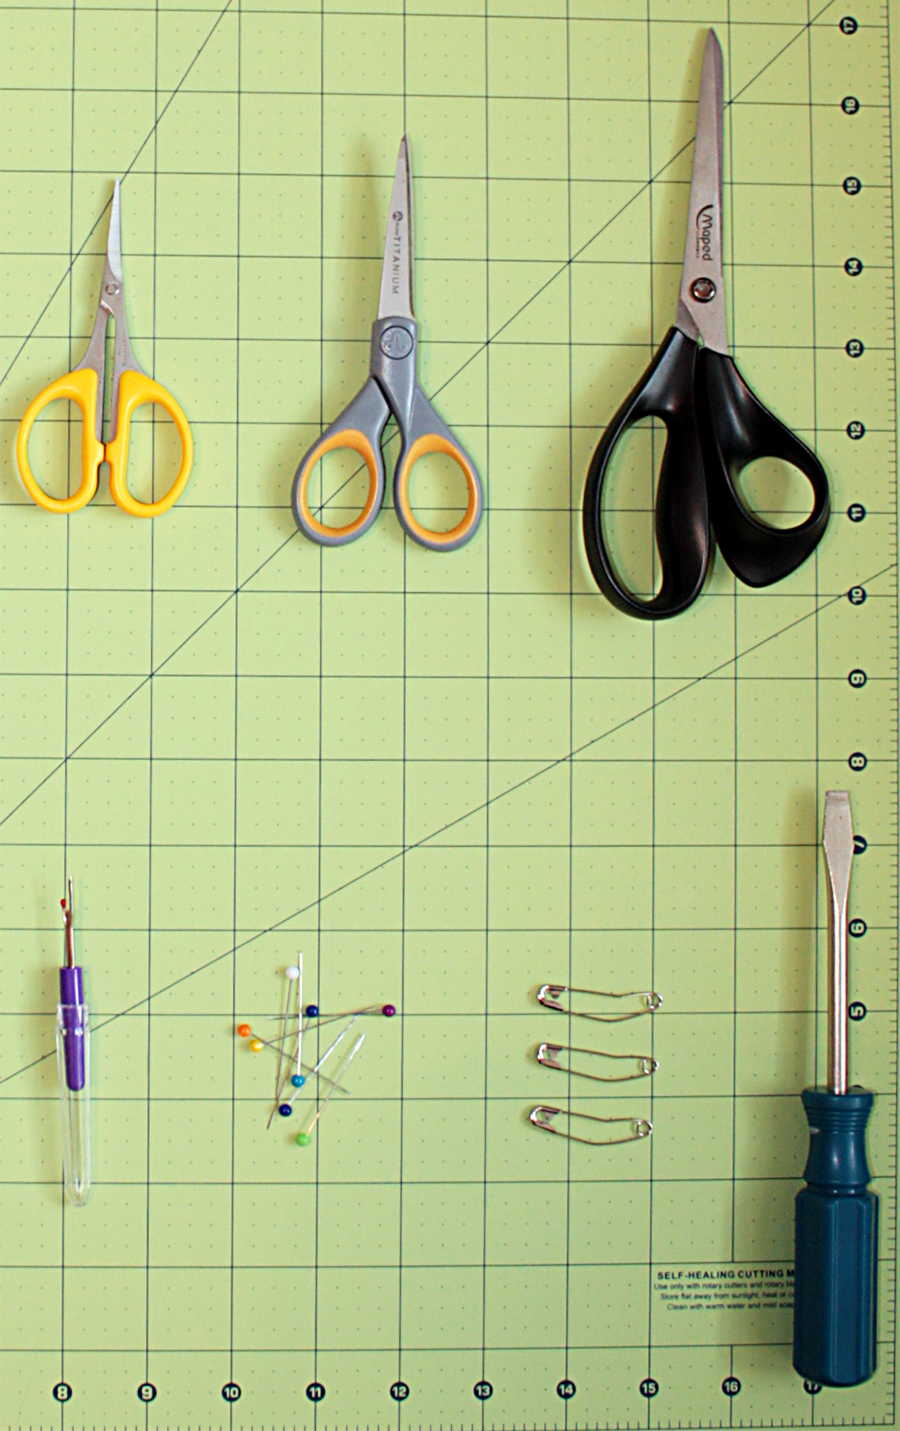
Scissors: I’m not picky when it comes to scissors, which is probably a problem. From left to right, I have some thread-cutting scissors, a nice (but short) pair of titanium scissors, and a long pair from the dollar store. You definitely need a good pair of scissors, but this isn’t where I’d spend much of my budget. I’d rather have a rotary cutter any day.

Pins: These, I’ve learned, are important. The first quilt you make will probably be simple enough that you won’t need to do too much pinning, so maybe you can get away without these right off the bat. But, they are inexpensive (especially on sale!) and will save you time, so I’d say go for it. The two types of pins you see here are straight pins and basting pins.
- Straight pins are used for various tasks, like lining up seams when you’re piecing a quilt top or when you’re folding and sewing the binding (the fabric “edges” of the quilt). The only preferences I have for these is that they not be too long and that they have colored tips on the non-pokey end. I drop them a lot.
- Basting pins are used when you are basting the quilt sandwich together. (You can also use basting spray, like here at Film in the Fridge). They are essentially curved safety pins, which are made to hold the layers of fabric and batting together (while you are quilting) without warping the fabric.
Miscellaneous: There are three other items I keep nearby while sewing.
- A seam ripper, to fix those crooked lines and the messed-up machine tension mistakes.
- A screwdriver, to change out the feet on the machine. When I finally get everything together to start a new phase of the quilt, I don’t want this to be what stops me.
- An iron, because there is a lot of ironing (well, technically it’s pressing) involved in quilting. My iron is the absolute most basic one offered.
I’m sure I’ve left some loose threads (pun intended), so feel free to leave a comment if you’d like more clarification on anything!
Tags: batting, cutting mat, fabric, foot, quilt, quilting, rotary, scissors, sewing, sewing machine, supplies, tools, walking foot